NSR Starter Guide
Congratulations! You have decided to set up your NoSongRequests.com Starter account – you are just a few minutes (and a few clicks) away from giving your audience a new and fun way to request songs. Let’s get started!
Personalizing Your DJ Page

Now that you have signed up you will want to personalize your DJ page. This is your unique page that you can share with your audience, fans, and friends. The first thing you will need to do is log in and view your settings. Here is how you login: How to Login and View your Settings
Once you are in, here are the settings you can update to create your awesome DJ page:
Update Your Profile Picture
Tip: Select a fun pic that reflects your personality
Update Your Profile Background
Tip: Make sure you use a royalty-free picture, don’t just copy an image you found on Google, or you might get a letter from a lawyer asking for money. Here is a link to royalty-free images you might like: https://pixabay.com/images/search/dj/
Add a Short Bio
Tip: This is part of your brand so have fun with it. Let your audience know what services you offer, fun facts about you, awards you have received, and favorite new artists. You can be as creative as you like, or just keep it simple with a short tagline.
Update Your Song Request Disclaimer
Tip: Getting song requests is a great way to connect with your audience (and get tips), but you probably are not going to be able (or want to) play every request. To help set expectations, we allow you to create your own customized disclaimer. This will be shown below the Send Request button that people will see when they send you a song request.
Add Your Emojis
Tip: Popular DJ emojis include: 🎤🎛🎚🎵🔥🎙🎧💿✨🤸💃 🎶
Add Your Social Media Links
Tip: Don’t just add your social media links to your DJ page, add your DJ page link to your social media posts and profile.
Add Your Upcoming Events
Tip: Include events that are open to the public. Don’t include private events.
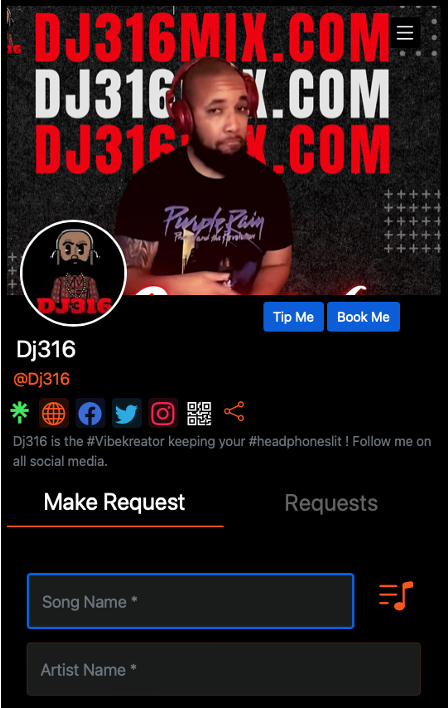
Your DJ page should be looking great. If you need a little inspiration, here are some examples of pages for some of our most successful DJs:
Printing your QR Code and Sharing Your DJ Page
Now that your DJ page is awesome and you are all set up, now it's time to get ready for your event.
To make a song request folks need to be able to find your DJ page. We make this easy by providing you with your own QR code for folks to scan and be taken to your page. Here are step-by-step instructions that walk you through how to print your QR code:
Tip: Once you select your options the system will create a custom .pdf file that you can download and print. You can also import that file into your slide show if you are bringing a monitor or tablet to your event. The QR code is yours to use in any creative way you can think of. The big goal is to make your QR code easy for the audience to find and use. Don’t be shy, tell the audience how to find and use your QR code. Here are some ideas to get you thinking:
- Tell the audience the next song played will be the most liked song request
- Give Shout Outs to folks that make good song requests
- Ask the Audience if they want to hear the most-liked song
If you can, get the audience to use the QR code and let you know what they want, they will be happy, and happy folks tend to tip!
You can also share your DJ page without using your QR code. Here’s how:
Tip: You can share your DJ page before an event and let folks submit song requests in advance, just make sure you add your upcoming event to your DJ page first.
Drinking from the Fire Hose – Managing your Alert Settings
Now that you are set up and folks are using your QR Code you are going to want to decide how and when you want to be alerted about new requests. The best way to view and manage your song request is via your DJ Page. If that doesn’t work for you or if you want to get song requests another way, you can also have song requests sent to you via email. To configure this feature, go to your Alert Settings and select if you want to receive notifications of song requests via Email. Here are step-by-step instructions that walk you through how to configure your alert settings:
Configure your Alert Settings:
Tip: You can choose intervals ranging from “Immediately” to “Weekly”. We recommend setting a frequency of 5 or 15 minutes. If you don’t want to get emails or text alerts, select the last option “Don’t Send Alerts” from the pull-down menu.
Going Live – Managing Song Requests
So you have your NoSongRequests.com account configured, you have your QR Code everywhere in the club from the bar to the restrooms, the energy is good, the drinks are flowing and the song requests are coming in.
The first thing you will want to do is to select the event or time frame you want to see song requests for. If you set up events your event will be on the pull-down menu, if you did not set up events you can just select songs “this week” to see songs requested this week. Once you have selected the event or date you want to view, you will now want to decide how you would like to sort your song requests. Here are your options with step-by-step instructions:
Add a Comment to a Requested Song:
So now you can review and manage your requests – what now? Here are some pointers:
Remember that you don’t have to play song requests immediately – don’t change your mind about that transition you’re about to do. It’s fine to take your time and weave requests in where they make the most sense.
Don’t feel compelled to play all requests – it’s OK if you don’t play all the requests you receive, it’s your set and your show.
When it comes to “iffy” requests, hedge your bets – What if you have to play something you think will bomb, because the venue owner, bride, etc. has asked for it? In these circumstances, you could consider turning the mic on and name-checking the person who asked for it before you play it. This makes it clear it wasn’t your idea, and may make others think twice before requesting songs that may get their names read out shortly before the dancefloor empties…
OK, you are ready! Have fun and connect with your audience. When you feel like you have mastered song requests and want to take it to the next level with Shoutout requests, tips, booking requests, and more we have you covered. You can upgrade anytime to NoSongRequests.com Pro for just $5.00 a month – click here to learn more:


